AgentScope 시작하기 — 설치부터 첫 에이전트까지
AgentScope 설치, 5가지 핵심 개념(Agent, Model, Memory, Toolkit, Formatter), ReActAgent로 도구 사용 에이전트 만들기.

AgentScope 시작하기 — 설치부터 첫 에이전트까지
ChatGPT에게 "이 CSV 파일 분석해줘"라고 하면 "파일을 업로드해주세요"라고 답합니다. AgentScope 에이전트에게 같은 말을 하면, 직접 파일을 열고, pandas로 분석하고, 결과를 보여줍니다.
이 글에서는 AgentScope를 설치하고, 도구를 쓸 수 있는 ReAct 에이전트를 만들고, 실제로 코드를 실행시켜 봅니다.
시리즈: Part 1 (이 글) | Part 2: 멀티 에이전트 파이프라인 🔒 | Part 3: MCP 서버 연동 🔒 | Part 4: RAG + 메모리 🔒 | Part 5: 실시간 음성 에이전트 🔒 | Part 6: 프로덕션 배포 🔒
이 시리즈에서 만들 것들
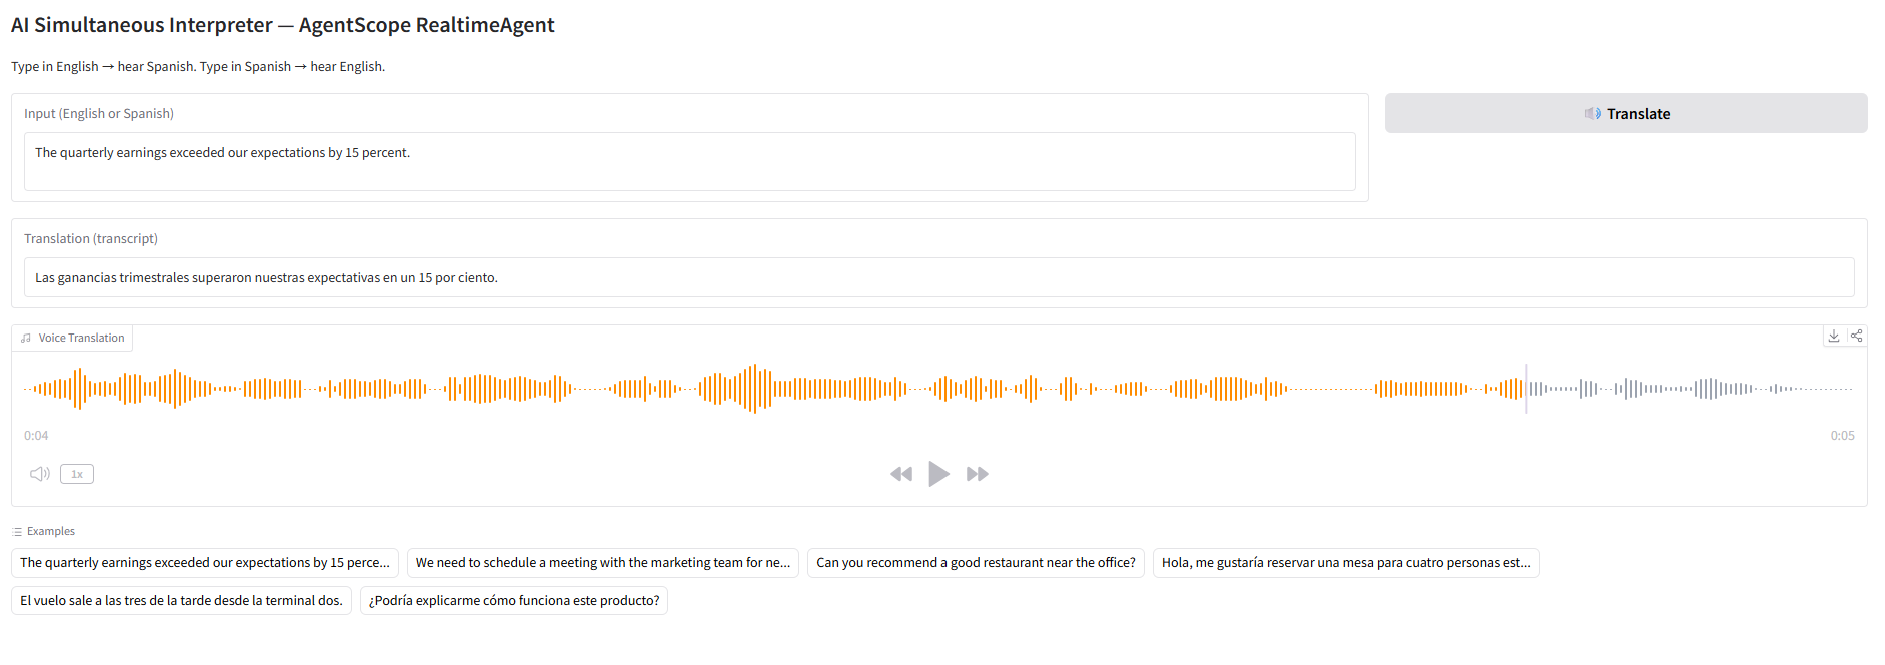
Part 5에서는 진짜 작동하는 음성 AI 앱을 만듭니다 — 튜토리얼이 아니라, 누구에게나 공유할 수 있는 실제 앱.
AI 동시통역기 — 영어를 입력하면 스페인어로, 스페인어를 입력하면 영어로 음성 번역합니다:
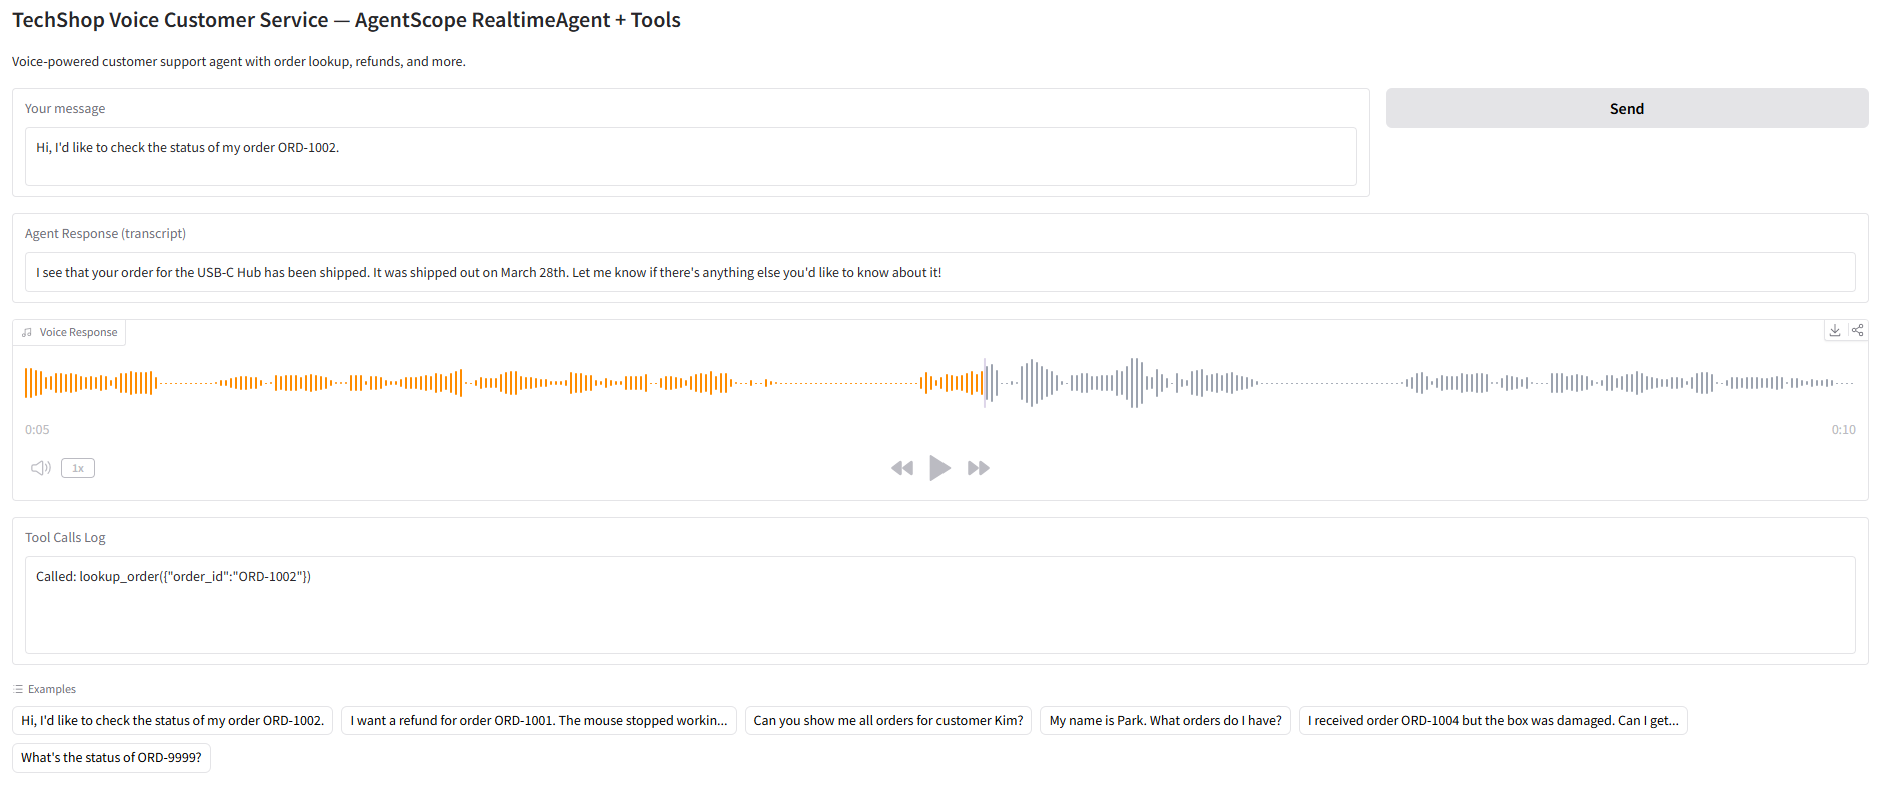
음성 고객상담 봇 — 주문 조회하고 환불까지 음성으로 처리하는 에이전트:
독립 실행 가능한 Python 파일로 Gradio UI가 포함되어 있습니다. 모든 코드를 단계별로 설명합니다.
직접 만들어보고 싶다면? Part 5: 3가지 음성 AI 앱 만들기로 이동하세요
1. AgentScope란?
AgentScope는 알리바바 Tongyi Lab이 만든 오픈소스 멀티 에이전트 프레임워크입니다.
| 항목 | 내용 |
|---|---|
| GitHub | agentscope-ai/agentscope (22K+ 스타) |
| 버전 | v1.0.18 (2026년 3월) |
| 라이선스 | Apache 2.0 |
| Python | 3.10+ |
| 핵심 철학 | Agent-Oriented Programming |
다른 프레임워크와 비교하면:
- LangGraph — 그래프로 워크플로우를 설계 (노드, 엣지, 상태)
- CrewAI — 역할극으로 에이전트 팀을 구성 (역할, 목표, 배경)
- AgentScope — 에이전트를 일급 객체로, async/await로 조합
AgentScope의 가장 큰 특징은 완전한 비동기 아키텍처와 ReActAgent 내장입니다.
2. 설치
기본 설치
pip install agentscope모든 모델 백엔드 포함
pip install agentscope[models]전체 설치 (RAG, 메모리, A2A 등)
pip install agentscope[full]기능별 선택 설치
pip install agentscope[rag]        # RAG + 벡터 저장소
pip install agentscope[memory]     # Redis + Mem0 + ReMe 메모리
pip install agentscope[a2a]        # Agent-to-Agent 프로토콜
pip install agentscope[realtime]   # 실시간 음성
pip install agentscope[tuner]      # RL 파인튜닝
3. 핵심 개념 5가지
AgentScope를 이해하려면 5가지 추상화를 알아야 합니다.
3-1. Agent (에이전트)
모든 에이전트의 기본 단위. ReActAgent가 가장 많이 쓰입니다.
from agentscope.agent import ReActAgent

agent = ReActAgent(
    name="Friday",
    sys_prompt="You are a helpful coding assistant.",
    model=model,
    memory=memory,
    toolkit=toolkit,
)ReActAgent는 ReAct(Reasoning + Acting) 패턴을 내장하고 있어서, 스스로 "생각 → 도구 호출 → 결과 관찰 → 다음 행동"을 반복합니다.
3-2. Model (모델)
LLM 백엔드를 추상화합니다.
from agentscope.model import OpenAIChatModel

model = OpenAIChatModel(
    model_name="gpt-4o",
    api_key="sk-...",
    stream=True,
)
지원 모델:
OpenAIChatModel— OpenAI, DeepSeek, vLLM 등 OpenAI 호환 APIAnthropicChatModel— ClaudeGeminiChatModel— GeminiDashScopeChatModel— Qwen (알리바바)OllamaChatModel— 로컬 모델
3-3. Memory (메모리)
대화 히스토리를 관리합니다.
from agentscope.memory import InMemoryMemory

memory = InMemoryMemory()
3가지 백엔드:
InMemoryMemory— 프로세스 내 메모리 (개발용)RedisMemory— Redis 기반 (분산 환경)AsyncSQLAlchemyMemory— SQLite/PostgreSQL (영구 저장)
3-4. Toolkit (도구)
에이전트가 사용할 수 있는 도구 모음입니다.
from agentscope.tool import Toolkit, execute_python_code, execute_shell_command

toolkit = Toolkit()
toolkit.register_tool_function(execute_python_code)
toolkit.register_tool_function(execute_shell_command)
내장 도구:
execute_python_code— Python 코드 실행execute_shell_command— 셸 명령 실행view_text_file— 파일 읽기write_text_file— 파일 쓰기
커스텀 도구도 쉽게 등록할 수 있습니다:
def get_weather(city: str) -> str:
    """Get the current weather for a city."""
    return f"The weather in {city} is sunny, 22°C"

toolkit.register_tool_function(get_weather)
3-5. Formatter (포매터)
모델별 메시지 형식을 자동 변환합니다.
from agentscope.formatter import OpenAIChatFormatter

formatter = OpenAIChatFormatter()
모델마다 메시지 형식이 다릅니다 (OpenAI의 messages, Anthropic의 messages + system, Gemini의 contents). Formatter가 이 차이를 추상화합니다.
4. 첫 번째 에이전트 만들기
모든 조각을 합쳐서 도구를 사용하는 ReAct 에이전트를 만들어 봅시다.
from agentscope.agent import ReActAgent, UserAgent
from agentscope.model import OpenAIChatModel
from agentscope.formatter import OpenAIChatFormatter
from agentscope.memory import InMemoryMemory
from agentscope.tool import Toolkit, execute_python_code
import asyncio, os

async def main():
    # 1. 도구 등록
    toolkit = Toolkit()
    toolkit.register_tool_function(execute_python_code)

    # 2. 에이전트 생성
    agent = ReActAgent(
        name="DataAnalyst",
        sys_prompt="You are a data analyst. Use Python to analyze data and answer questions.",
        model=OpenAIChatModel(
            model_name="gpt-4o",
            api_key=os.environ["OPENAI_API_KEY"],
            stream=True,
        ),
        memory=InMemoryMemory(),
        formatter=OpenAIChatFormatter(),
        toolkit=toolkit,
    )

    # 3. 유저 에이전트 (터미널 입력)
    user = UserAgent(name="user")

    # 4. 대화 루프
    msg = None
    while True:
        msg = await agent(msg)
        msg = await user(msg)
        if msg.get_text_content().lower() == "exit":
            break

asyncio.run(main())
실행하면 터미널에서 에이전트와 대화할 수 있습니다:
user: Calculate the first 20 Fibonacci numbers
DataAnalyst: [Thinking] I need to write Python code to generate Fibonacci numbers.
DataAnalyst: [Tool Call] execute_python_code
DataAnalyst: The first 20 Fibonacci numbers are: 0, 1, 1, 2, 3, 5, 8, 13, 21, 34, 55, 89, 144, 233, 377, 610, 987, 1597, 2584, 4181
5. 커스텀 도구 만들기
실전에서는 커스텀 도구를 만들어 등록합니다. 간단한 웹 검색 도구를 만들어 봅시다.
import httpx

def search_web(query: str, max_results: int = 3) -> str:
    """Search the web using DuckDuckGo and return top results.

    Args:
        query: The search query string.
        max_results: Maximum number of results to return.

    Returns:
        A formatted string of search results.
    """
    url = "https://api.duckduckgo.com/"
    params = {"q": query, "format": "json", "no_html": 1}
    resp = httpx.get(url, params=params, timeout=10)
    data = resp.json()

    results = []
    for item in data.get("RelatedTopics", [])[:max_results]:
        if "Text" in item:
            results.append(item["Text"])

    return "\n".join(results) if results else "No results found."

toolkit.register_tool_function(search_web)
핵심 포인트: 도구 함수의 docstring이 중요합니다. AgentScope는 docstring을 파싱해서 LLM에게 도구 설명을 전달합니다. Args 섹션의 타입과 설명이 정확해야 합니다.
6. 구조화된 출력
에이전트가 자유 텍스트 대신 구조화된 JSON을 반환하도록 설정할 수 있습니다.
from pydantic import BaseModel

class AnalysisResult(BaseModel):
    summary: str
    key_findings: list[str]
    confidence: float

agent = ReActAgent(
    name="Analyst",
    sys_prompt="Analyze the given data and return structured results.",
    model=model,
    memory=memory,
    formatter=formatter,
    toolkit=toolkit,
    structured_output=AnalysisResult,  # Pydantic 모델 지정
)
7. 메모리 압축
긴 대화에서 컨텍스트 윈도우를 초과하지 않도록 자동 압축이 가능합니다.
from agentscope.agent import CompressionConfig

agent = ReActAgent(
    name="Friday",
    sys_prompt="...",
    model=model,
    memory=memory,
    formatter=formatter,
    toolkit=toolkit,
    compression=CompressionConfig(
        max_tokens=4000,       # 이 토큰 수를 초과하면 압축
        keep_recent=5,         # 최근 5개 메시지는 유지
    ),
)
압축된 메모리에는 다음이 포함됩니다:
- 작업 개요
- 현재 상태
- 핵심 발견 사항
- 다음 단계
- 보존할 컨텍스트
8. 에이전트 Hook 시스템
에이전트의 동작을 커스터마이징하려면 Hook을 사용합니다.
async def logging_hook(agent, msg):
    print(f"[LOG] {agent.name} received: {msg.get_text_content()[:50]}")
    return msg

agent = ReActAgent(
    name="Friday",
    sys_prompt="...",
    model=model,
    memory=memory,
    formatter=formatter,
    toolkit=toolkit,
    hooks={
        "pre_reply": [logging_hook],
        "post_reply": [logging_hook],
    },
)
사용 가능한 Hook 포인트:
pre_reply— 에이전트가 응답하기 전post_reply— 에이전트가 응답한 후pre_observe— 메시지를 관찰하기 전post_observe— 메시지를 관찰한 후pre_print/post_print— 출력 전후
마무리
이 글에서 다룬 내용:
- AgentScope 설치 (기본 / 모델 / 전체)
- 5가지 핵심 개념: Agent, Model, Memory, Toolkit, Formatter
- ReActAgent로 도구를 사용하는 에이전트 생성
- 커스텀 도구 등록
- 구조화된 출력, 메모리 압축, Hook 시스템
다음 글에서는 여러 에이전트를 파이프라인으로 연결하고, MsgHub로 그룹 대화를 구성하는 방법을 다룹니다.
다음: Part 2: 멀티 에이전트 파이프라인 — MsgHub + FanoutPipeline
이메일로 받아보기
관련 포스트

Google COSMO 해부 — 온디바이스 AI 에이전트의 새 아키텍처
Google이 실수로 공개한 차세대 AI 어시스턴트 COSMO. Gemini Nano + PI 서버 + 하이브리드 모드의 3-모드 아키텍처를 완전히 분석합니다. Google I/O 2026 직전 유출.

스스로 진화하는 AI 에이전트 — 2026년의 새로운 패러다임
GenericAgent, Evolver, Open Agents — 스스로 스킬을 만들고, 실행 경로를 기억하고, 실패에서 배우는 자가 진화 에이전트 3종 비교.
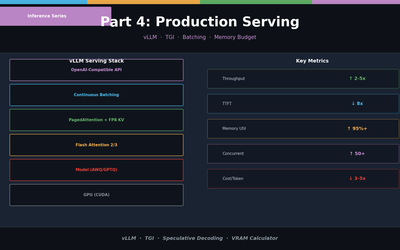
LLM 추론 최적화 Part 4 — 프로덕션 서빙
vLLM과 TGI로 프로덕션 배포. Continuous Batching, Speculative Decoding, 메모리 버짓 설계, 처리량 벤치마크.