Securing ClawdBot with Cloudflare Tunnel
Learn about the security risks of exposed ClawdBot instances on Shodan and how to secure them using Cloudflare Tunnel.

Securing ClawdBot with Cloudflare Tunnel
ClawdBot is a powerful AI assistant that runs locally on your machine. While it's convenient for connecting to WhatsApp, Telegram, Discord and other messengers, using it with default settings poses security risks. This guide covers the dangers of exposed ClawdBot instances on Shodan and how to secure them using Cloudflare Tunnel.
What is ClawdBot?
ClawdBot is an open-source personal AI assistant based on Claude AI. It runs locally on your machine and connects to various messenger platforms through a Gateway server.
Key Features
- Runs locally (Mac, Windows, Linux, Raspberry Pi)
- Supports WhatsApp, Telegram, Discord, Slack, and more
- WebSocket-based Gateway (default port: 18789)
- Complete data privacy
The Problem: Exposed ClawdBot Instances on Shodan
Searching for port 18789 on Shodan reveals publicly exposed ClawdBot Gateway instances across the internet.
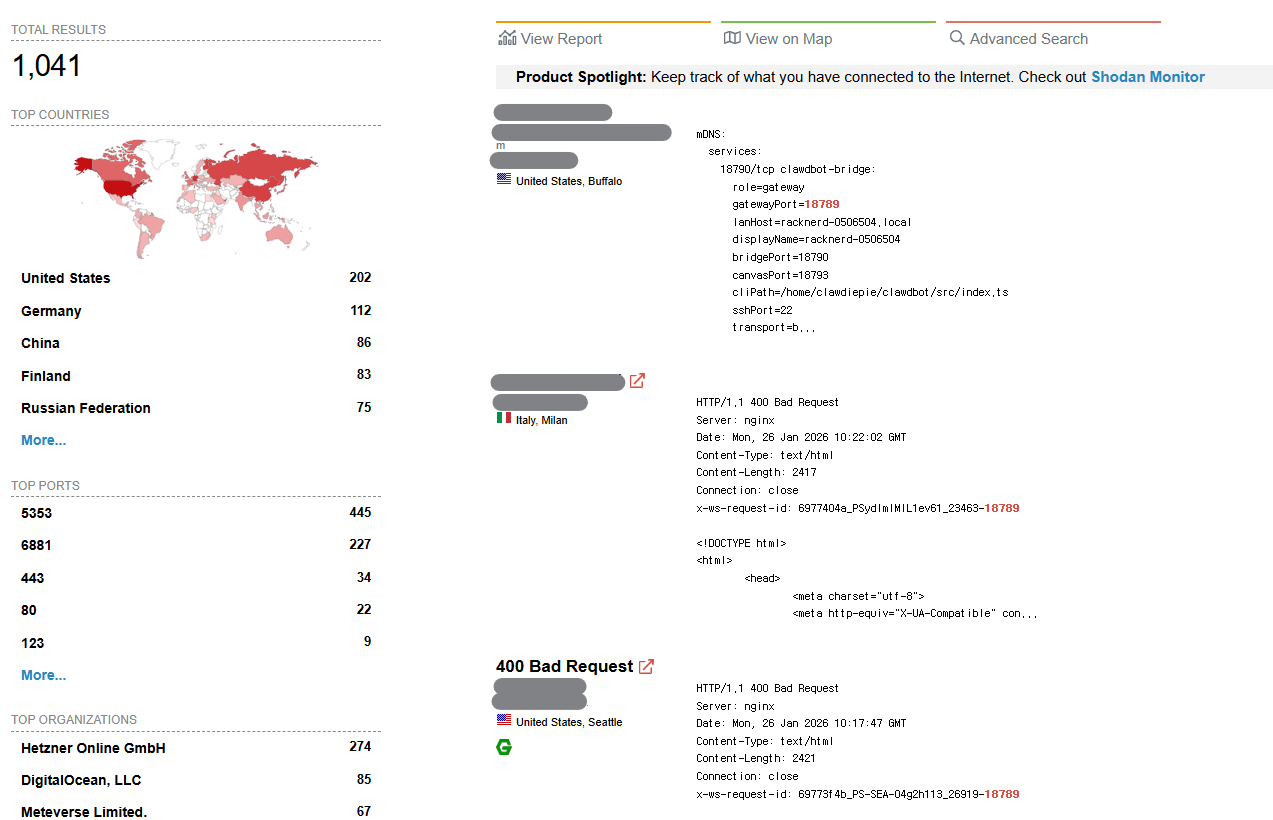
Why is this dangerous?
- Unauthorized Access: Anyone can connect to the Gateway without authentication
- Conversation Leakage: All AI conversations could be exposed
- API Key Theft: Connected Claude API keys could be stolen
- Bot Hijacking: Attackers could take control of your messenger bots
Many users enable external access with --bind 0.0.0.0 for convenience, without setting up firewalls or authentication.
The Solution: Cloudflare Tunnel
Cloudflare Tunnel allows secure access to your server without directly exposing ports to the internet.
Benefits
- No Port Exposure: No need to open port 18789 to the internet
- DDoS Protection: Cloudflare's protection applied automatically
- Access Policies: Control access by email, IP, and more
- Free: Basic features are completely free
Cloudflare Tunnel Setup Guide
1. Prerequisites
- Cloudflare account (free)
- Your own domain (connected to Cloudflare DNS)
- Server running ClawdBot
2. Install cloudflared
macOS:
brew install cloudflaredUbuntu/Debian:
curl -L --output cloudflared.deb https://github.com/cloudflare/cloudflared/releases/latest/download/cloudflared-linux-amd64.deb
sudo dpkg -i cloudflared.deb
Windows:
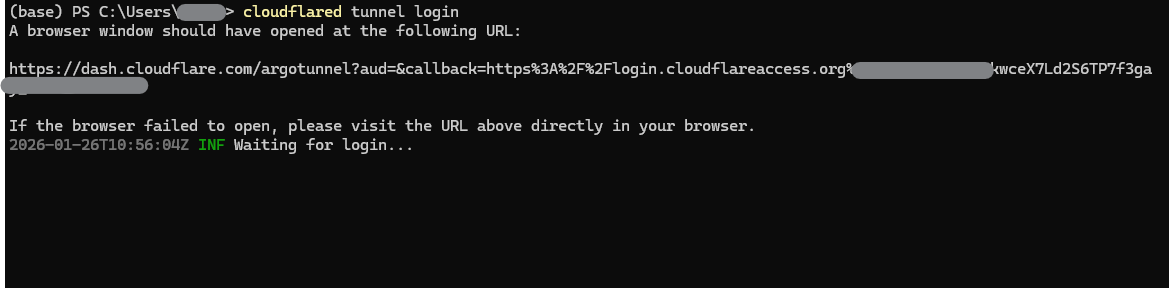
winget install --id Cloudflare.cloudflared3. Login to Cloudflare
cloudflared tunnel loginA browser will open - log in with your Cloudflare account and select your domain.
4. Create a Tunnel
cloudflared tunnel create clawdbot-tunnel
5. Configure DNS Record
cloudflared tunnel route dns clawdbot-tunnel clawdbot.yourdomain.comThis automatically adds a CNAME record to your Cloudflare DNS.
6. Create Configuration File
Create ~/.cloudflared/config.yml:
tunnel: xxxxxxxx-xxxx-xxxx-xxxx-xxxxxxxxxxxx  # Your tunnel UUID
credentials-file: /home/user/.cloudflared/xxxxxxxx-xxxx-xxxx-xxxx-xxxxxxxxxxxx.json

ingress:
  - hostname: clawdbot.yourdomain.com
    service: http://localhost:18789
  - service: http_status:404
7. Run the Tunnel
cloudflared tunnel run clawdbot-tunnel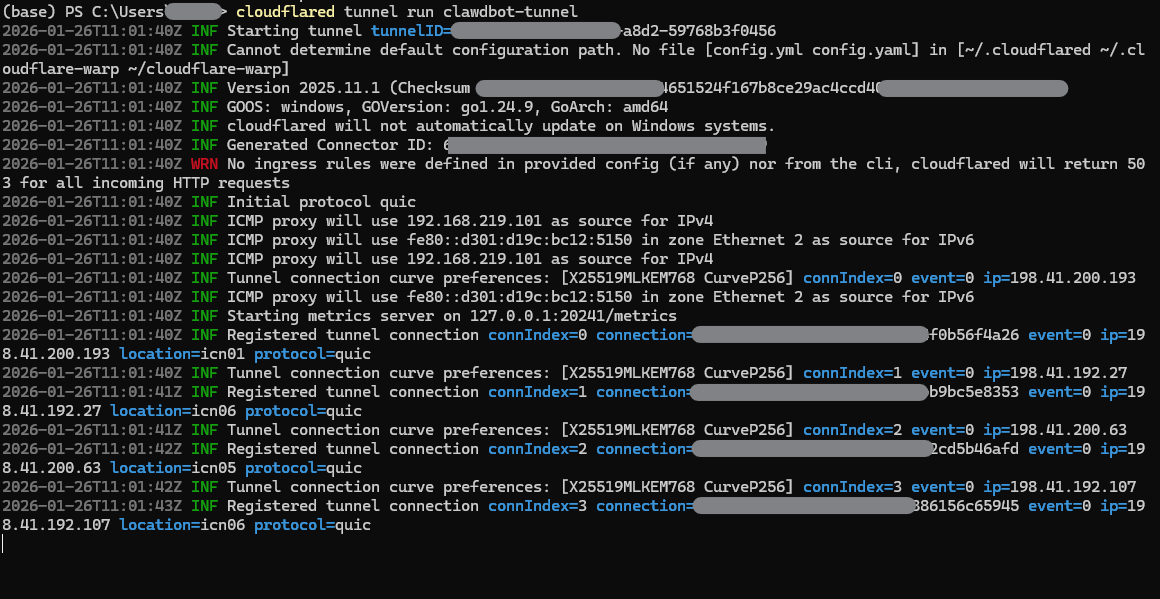
8. Install as Service (Optional)
To automatically start the tunnel on server reboot:
sudo cloudflared service install
sudo systemctl enable cloudflared
sudo systemctl start cloudflared
9. Approve ClawdBot Device
When first connecting through Cloudflare Tunnel, ClawdBot Gateway detects proxy headers:
[ws] Proxy headers detected from untrusted address. Connection will not be treated as local.
Add Cloudflare Access for Extra Protection (Optional)
If sharing with a team or external users, you can add an email authentication layer using Cloudflare Zero Trust's Access feature. For personal use, ClawdBot's built-in device approval is sufficient.
Setup: Cloudflare Zero Trust dashboard > Access > Applications > Add Self-hosted app
Final Architecture
[User] → [Cloudflare Edge] → [Cloudflare Tunnel] → [localhost:18789]
              ↓                                            ↓
      [DDoS Protection]                         [ClawdBot Device Approval]
              ↓
[Automatic HTTPS]- No ports exposed to the internet (not discoverable on Shodan)
- ClawdBot's built-in device approval for access control
- DDoS and malicious traffic blocked
- Automatic HTTPS
ClawdBot Security Audit (Additional Security)
ClawdBot provides a built-in security audit feature. You can check your current configuration's security status and automatically fix issues.
Check security status:
clawdbot security audit --deep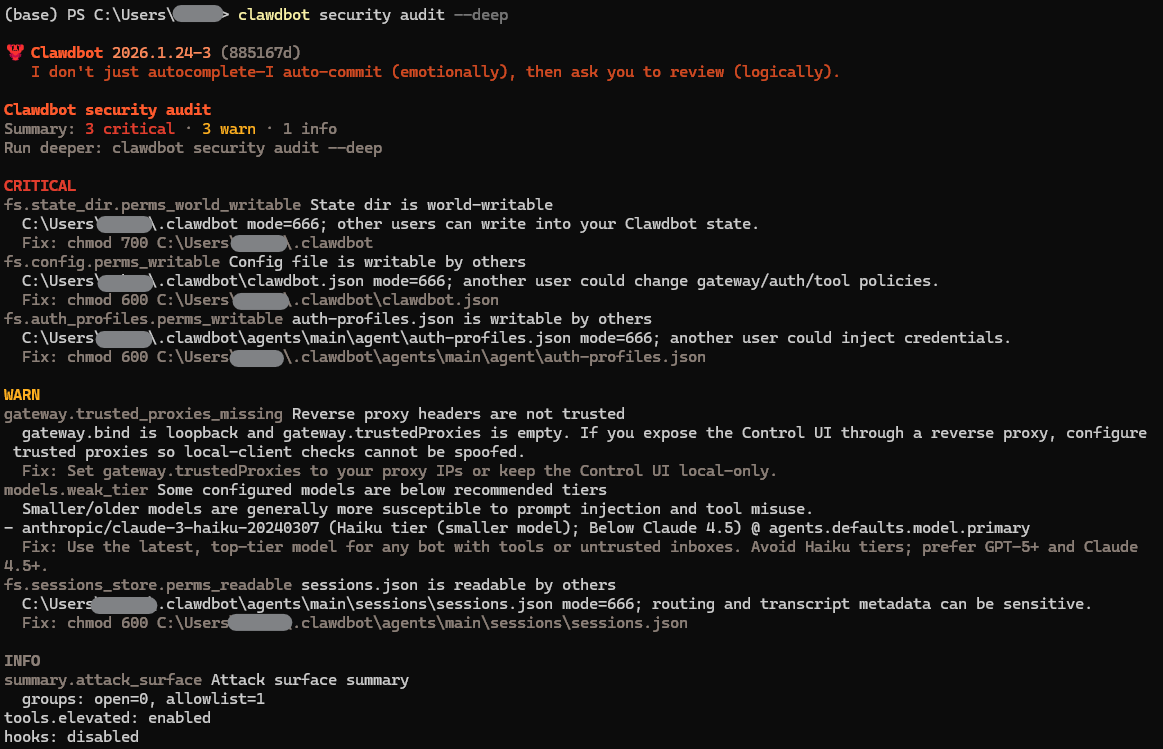
This command checks:
- Configuration file permissions
- API key exposure
- Network binding settings
- Certificate validity
Auto-fix issues:
clawdbot security audit --fix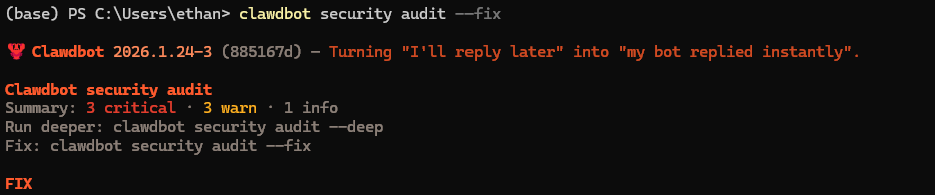
If issues are found, it secures file permissions and optimizes security settings.
Firewall Configuration (Additional Security)
After setting up the tunnel, block port 18789 in your local firewall for extra security:
# UFW (Ubuntu)
sudo ufw deny 18789

# iptables
sudo iptables -A INPUT -p tcp --dport 18789 -j DROP
Now the ClawdBot Gateway is only accessible through Cloudflare Tunnel.
Conclusion
ClawdBot is a powerful tool, but using it without proper security can be dangerous. With Cloudflare Tunnel, you get:
- No Port Exposure: Not discoverable on Shodan
- Double Security: Tunnel + ClawdBot device approval
- Free: Basic features are completely free
- Easy Setup: Quick configuration
If you want to run your personal AI assistant securely, Cloudflare Tunnel is the easiest and most effective solution.
References
Subscribe to Newsletter
Related Posts

Why Do Vibe-Coded Apps Break? — Real Incidents and How to Survive
1.5M API keys exposed, production databases deleted, 72K government IDs leaked — analyzing 6 real vibe coding incidents and 7 recurring failure patterns.
Agent in Production — From Guardrails to Docker Deployment
Implement Input/Output Guardrails, LLM-as-Judge, Human-in-the-Loop, and deploy to production with FastAPI + Docker.

MCP + Multi-Agent — How Agents Share Tools and Collaborate
Standardize tools with MCP, build role-based multi-agent systems with CrewAI. A2A protocol and architecture selection guide.